
Understanding the katana can be a study that truly lasts a lifetime, with even the top experts learning more every day. While authentic Japanese Katana can range from $3-$5K, the average collector is looking for that authentic look without the price tag. But how do you know what makes a good Katana? What factors should you consider and what are the most important features? Are you looking for an ornamental piece or a fully functioning sword? While the terminology and descriptions can be overwhelming to a new collector, we hope this basic Katana Buyer’s Guide begins to answer some of your katana questions. Here we cover each segment briefly, with more in-depth information to follow. And always check out our YouTube channel for the Katana playlist.
The Blade (Nagasa)
The soul of the Samurai lied in his beautiful and deadly sword, with the Katana ultimately becoming known as the sword of the Samurai. The length of the Katana blade, or Nagasa, measures between 60-76cm (24”-30”) and has a total length, with the handle, of 100-110cm. The average weight ranges between 1.1-1.3kg (2-3lbs). Designed as a two-handed weapon, the katana replaced the original Tachi sword design. While Samurai warriors wore the tachi blade side down, the Katana is worn with the blade side up, enabling warriors to draw their swords and strike an enemy with a single motion.
Here we take a closer look at the katana blade, its main components, changes between the authentic and modern methods of forging, and more in an effort to expand your knowledge and give you a better understanding of the katana before you decide on the best sword to add to your collection.
Through-Tempered vs. Differentially Hardened
Hardening of modern katana blades can occur in two different ways: Through Tempered (also known as Monotempered) and Differentially Hardened. Authentic Katana swords underwent differential hardening, but is there really a difference? Let’s take a closer look.
- Differential Hardening – During this process, the spine and body of the blade are coated in a clay mixture before being heated and quenched. The use of clay acts as an insulation that allows the coated section to cool slower than the rest of the blade. This creates a sharp blade edge and a softer, more flexible body. The use of clay also creates the blade hamon the katana is known for.
- Monotempered – A through-tempered blade has a consistent hardness throughout, with no real hamon unless a fake one is applied for aesthetics.
So which blade is best? It depends on what you are looking for. If we look at the HRC (Hardness Rockwell Cone), a differential hardened katana has an average HRC of 58-60 edge hardness and 38-40 on the spine while a monotempered katana scores in the low 50s. The higher the blade HRC, the more it can be sharpened and the longer it will hold that sharpness. This means that a differential katana will likely have a sharper blade that will stay sharper for longer while still retaining the softer spine that allows for extra shock absorption. Wielders of differentially-tempered katana must execute skillful and straight cuts when slicing through a target as notable torque of the blade or improperly aligned cuts can very well bend the blade of a differentially hardened katana. However, the monotempered still holds a sharp edge and is much easier to polish scuffs and scratches, and can be spring tempered to return straight, making it a good blade for beginners wishing to do a lot of test cutting.
Learn more about through-tempered vs. differentially hardened blades →
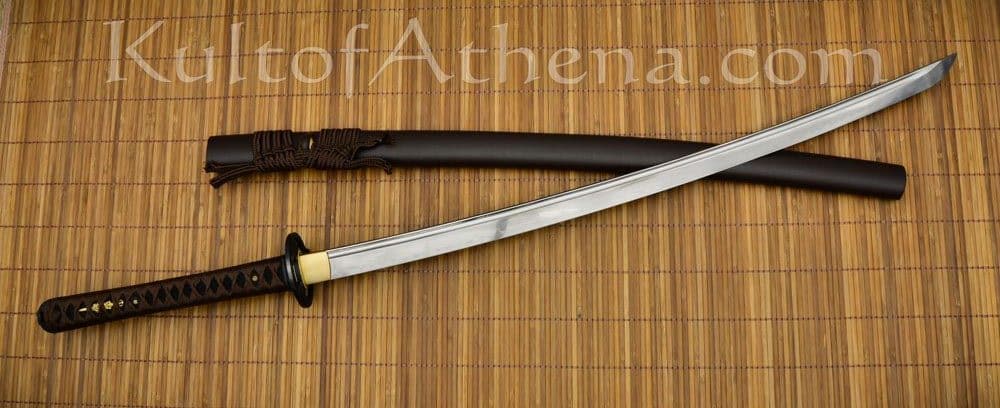
This Iron Tiger Forge – Mitsudomoe – T10 blade is crafted from differentially hardened and sharpened T10 steel. The tempering of the blade has left it with a very visible, wave-like hamon along its edge. The tip of the blade has a geometric Yokote and Chu-Kissaki tip.
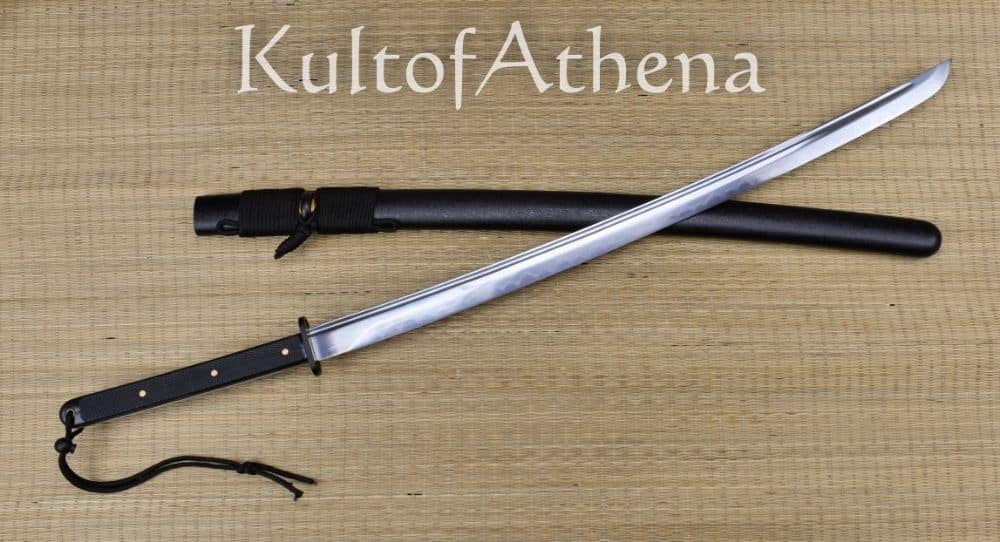
This is also one of our differentially-tempered blades, the Musashi – Tactical Modern Katana
Plain vs. Folded Steel
When the katana originated, steel was not the same as it is today, especially in Japan. Swordsmiths took days to create their tamahagane steel through a process of smelting iron sand and charcoal. While effective at making steel, this tamahagane had many impurities. To remove these impurities, swordsmiths manipulated the steel by heating, hammering, and folding the steel up to 16 times. While many still use this traditional method, today’s steel does not have those original impurities and the folding process is no longer necessary.
While many collectors still look for the authentic process and the appearance it creates when purchasing a katana, the folding process does not improve the hardness or performance and, in some cases, can actually weaken the blade if crafted by an inferior swordsmith. When properly and skillfully forged it adds historical and visual authenticity to the construction of the blade and may leave tell-tale ripple-like patterning throughout the blade that can be quite beautiful. We carry a number of quality-inspected folded steel katanas.
Learn more about plain vs. folded steel blades →
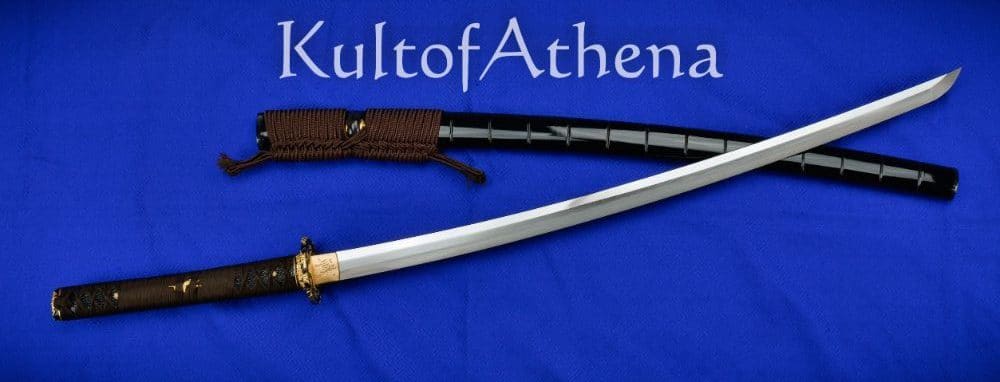
This is one of our Tamahagane Katanas, the BattleBlades – Sōdai Tamahagane Katana
What is the Geometric Yokote?
A geometric yokote is a distinctive transition line that separates the body of the blade, or Ji, and the Kissaki, or the blade tip. While this tip transition line is aesthetically desirable, it also helps to reinforce the blade tip for effective thrusting. The clearer defined the geometric yokote is, the more effective it is at dissipating the blade and tip impact on a thrust. This is a rare feature, however, to find on mass-produced swords as it takes experienced polishing skills to achieve. Most production katana instead cross-polish the tip in a different direction from that of the blade to create the visual illusion of a geometric yokote.
Learn more about the geometric yokote →
Geometric Blade Profiles
The profile of a blade refers to how the blade tapers toward the edges. Blades with a more gradual taper work best for cutting, while those with a more acute taper work best for thrusting. Some common sword tapers include:
- Shinogi Zukuri – The shinogi zukuri is the most common blade shape for the katana and works well for both speed and cutting. With this blade, the shinogi, or ridge line, is closer to the mune, or back edge. The blade has a slight curve and a definitive yokote.
- Shobu Zukuri – The shobu zukuri is like the shinogi but with a couple distinct differences. This blade does not have a yokote but sports a slightly curved tip.
- Unokubi Zukuri – The unokubi zukuri provides excellent balance with a strong cutting blade and sports a deep bo-hi in the last 2/3 of the shinogi ridge of the blade.
- Kissaki-Moroha-Zukuri – Kogarasu Maru, translating to little crow, is the most famous blade with this style, believed to be created by Amakuni, a legendary Japanese swordsmith, in the 8th This double-edged blade is shaped like a Tachi; however, the tip is symmetrical, with both blades sharp. A single koshi-hi groove runs from the tang to the transition point where the blade becomes double-edged.
Learn more about geometric blade profiles →
This is one of the Katana’s that has a Geometric Yakote Tip, Balaur Arms – Clay Tempered T10 Shirasaya Katana

Different Kissaki Options
The Kissaki is the tip of the Japanese Katana and begins at the Geometric Yokote. There are a variety of different sizes and shapes available when it comes to the Kissaki, and we take a closer look at some different Kissaki and some common terms associated with this part of the Katana.
- Ko-Kissaki – Ko means small and the Ko-Kissaki is the smallest tip size when it comes to Japanese swords. This tip size was used mostly for Tachi blades in the 12th century and typically measures 3cm.
- Chu-Kissaki – Chu means middle and generally measures 4-6cm. This is the most common Kissaki size for the katana sword.
- O-Kissaki – O means large and the O-Kissaki is the largest of the Kissaki, with a length far longer than its width, measuring 7-8cm. This tip type started around the 14th century and typically appears on swords with a length of 90cm or more.
- Fukura – Fukura refers to the curved portion of the Kissaki extending from the yokote to the tip. Straighter edges have less Fukura while more curved edges have much more.
- Ikubi Kissaki – Ikubi means boar’s neck. This tip has a Kissaki with a shorter length than the width of the blade at the yokote.
- Ikari Kissaki – This Kissaki has a slight upswept point.
- Kamasu Kissaki – This early Kissaki, named after a fish with a long beak, has no curvature in the fukura.
Learn more about different Kissaki variations→
Bo-hi or No-hi?
Bo-hi, also known as bohi, hi, blood groove, or fuller, is a groove in the blade, just underneath the spine, that helps reduce the weight of the katana. The addition of a bo-hi reduces the weight of a blade by 20-35%, without any real sacrifice to blade integrity or strength. In making the blade lighter, the bo-hi creates a faster blade and shifts the balance point closer to the person wielding the sword. However, the lighter the sword, the less powerful the cutting ability may be. For those choosing their katana for its cutting ability may opt with No-hi, while martial artists doing demonstrations may opt for the bo-hi that allows for more graceful movement.
What Is Niku?
Niku translates to mean meat. In the terms of a katana blade, niku sharpening allows the blade to remain considerably thicker and more resistant while still allowing for a sharp cutting edge. Taking a closer look at a niku blade, you will see the edge has a wider angle, allowing it to withstand damage without cracking which was important for battle and dueling where contact with an opponent’s blade or armor could be expected. However, niku sharpening does slightly reduce the cutting ability. While authentic and historic katanas all sported niku sharpening, many modern katana enthusiasts competing in cutting opt for a flatter sharpening edge that provides a smooth cut that is optimized for slicing tatami for competition cutting.
Learn more about different niku shapes here→
The Hamon
The hamon is the tempering line created through the differential hardening process we described above. When they heat and quench the clay-covered blade, the edge cools faster than the spine. When this occurs, the steel in the hamon area turns into a crystalline structure called martensite. This creates a noticeable line on the blade which can be straight to wavy in appearance.
Unfortunately, with modern katanas, this forging practice takes great skill and has a high incidence of failure, meaning that differential hardened katanas cost more than their monotempered counterparts. A monotempered katana will not sport a natural hamon, however, skilled craftsmen can add a fake hamon to complete the authentic look. But how can you tell if a hamon is natural or not? The only way to test for a true hamon is to check the hardness of the edge and the spine. If they are the same, then the hamon is not real.
This Balaur Arms – Kagutsuchi Straight Bladed Katana has a blade of forged T10 high carbon steel that is ablaze with a flame-like hamon of traditionally clay-tempered steel along its edge. The blade is lightened with a bo-hi groove which sacrifices little in durability for a great gain in agility. The straight blade of this Katana lends itself well to thrusting and cutting in equal measure and its enlarged O-Kissaki tip imbues it with even greater puncturing power when used in a thrust. The blade edge has “Niku” in its form to give the edge resilience against edge damage and a high-quality mirror polish to bring out the beauty of the steel and hamon to complete the blade.

The Mei – The katana smith signature on the blade.
The mei is the swordsmith’s signature on the blade. On a sword, the mei should always face outward when the sword is worn. In this case, you will find the Tachi sword has a signature on one side, while the katana, worn blade up, will have the mei on the opposing side. Mu mei refers to swords with no signature. In some cases, the mei included more than just the swordsmith’s signature and often included the province and the date of the production. A tameshi mei includes the sword’s sharpness results from a cutting test.
The Handle (Tsuka)
While many believe the blade is the most important part of the katana, the handle and how it attaches to the blade are also major and distinct components. The handle, or Tsuka, is the base of the sword and connects to the blade. Between the Tauka and the Nagasa, you have the fuchi, or hilt collar, the Tsuba, or hand guard, the Seppa, or the washers that tighten the fittings, and the Habaki, the wedge-shaped collar that keeps the sword from falling out of the Saya, or scabbard for the blade. Here we offer some insight to some common handle components.
Basic Shapes of the Katana Tsuka
The katana tsuka core comes from a hard wood cut into two pieces. Once cut, the designer carves the wood in a manner that allows the two pieces to come together, encircling the tang of the blade. At that point, the maker carves the wood into the desired handle shape. There are four basic tsuka shapes for the katana and these are:
- Haichi Tsuka – This is the most common katana tsuka shape. The mune side is almost completely straight while the ha side sports a slight taper.
- Rikko Tsuka – This tsuka is the shape of an hourglass, with narrowing in the center.
- Imogata – This is the simplest of the tsuka with both sides completely straight.
- Morozori – This handle shape matches and follows the curve of the saya, with both sides showing a curve.
This carved wood serves as the core of the katana tsuka and once created, one applies the samegawa and ito wrapping.
What is Samegawa
Samegawa, also referred to as samekawa, same, or samehada, is a wrap that goes around the wooden core of the tsuka. This wrap is typically stingray skin which features textured nodes. The larger nodes on the skin, referred to as Emperor nodes, are more desirable and its presence is the hallmark of a superior cut and grade of ray skin being used for the wrap. The purpose of the samegawa is to wrap and protect the wooden core, keep hands from sweating and slipping while holding the katana, and help the ito maintain its wrap and placement. While natural ray skin is the most desirable, synthetic replications can help reduce costs. The samegawa can either be a full wrap or you can use panels to save cost.
This BattleBlades – Nagi-gatana has genuine samegawa ray skin tsuka under the Hinerimaki-wrapped silk Ito and it is embellished with highly detailed fuchi and kashira as well as an antiqued brass tsuba. Custom-made brass habaki and glaive polearm menuki add the finishing touches to the outstanding koshirae.

What are Hishigami?
While the Samegawa works to hold the ito cord that wraps the Tsuka in place, hishigami is another, just as important component. In fact, proper tsukamaki, or wrapping, cannot be done without hishigami. So, what is hishigami? Made typically from rice paper, hishigami is small, folded pieces of paper placed under the flat sections of the ito, before the twists, as it wraps the tsuka. It helps to hold the wrap in place, lifts the ito into the twists, and makes for a tighter overall wrap. The pieces of rice paper are folded into shapes that look like small houses, allowing them to sit flat under the flat ito while slightly lifting near the twist.
Different Ito Styles
The art of wrapping the tsuka, known as tsukamaki, requires patience and attention to detail. We have already covered the use of the samegawa that helps to hold the wrap in place, as well as the hishigami that helps to create a tight and well-fitting wrap. Now we take a closer look at the different wrapping styles available for the ito wrap. These include basic traditional wraps, battle wraps, and the more extensive and specialty wraps available.
- Hineri Maki – This is the most common ito wrap we see in production katanas. It features the traditional diamond openings from end to end on both sides. As the ito is wrapped, it is folded at the crossover.
- Tsumami Maki – The tsumami maki is a fancier version of the common hineri. It is more prevalent in Japan than it is in the United States. Instead of folding at the crossover, strands of the ito are pinched, making it sit slightly higher.
- Katahineri Maki – This wrap style combines the hineri and tsumami, with the top strand pinched at the crossover while the bottom is folded.
- Hira Maki – This is an older style where both strands remain flat at the crossover.
- Katate Maki – Known as the battle wrap, this style features one of the wrap styles mentioned above at the beginning and the end of the tsuka, but the center portion sports a flat spiral wrap. In many cases, the menuki (covered next) goes in this area.
- Shonai-zuka Katate Maki – Known for high-ranking samurai- the shonai-zuka is a more complex katate maki wrap that requires a full samegawa wrap or wide panels that will hide the wooden tsuka core from the larges wrap openings. With this wrap style, the beginning and end of the tsuka has either the hineri maki or the tsumami maki. The center section, however, rolls the ito in a tube formation. This allows segments of the samegawa to show between each strand.
- Akechi Katate Maki – This rare wrap style features a single strand of ito spiral wrapped from the beginning all the way to end knots, with equal space in between each spiral. This style requires a full samegawa wrap to completely cover the wood core and keep it from being exposed in the spaces.
The Menuki
Menuki are a pair of small ornaments originally placed to cover the mekugi (the nail securing the blade to the tsuka. Over time, its placement became more ornamental in nature. The placement is one on each side of the handle. This placement allows the fingers of each hand to rest on the mekugi when holding the sword. However, the alternate configuration, known as gyakumenuki, positions the mekugi in the reverse position. This allows the menuki to rest in the palm of each hand. Placement varies by owner and depends on comfort.
This Dragon King – Fletching Katana has two arrowhead menuki that is woven beneath the ito cords.

We know this basic katana buyer’s guide is just a start. For more information on these elements, explore our Japanese Bladed Weapon Glossary.
At Kult of Athena, we strive to bring you a wide variety of high-quality katana swords for sale.
Leave a Reply